Leprechaun Hat Cookies
Highlighted under: Simple Sweets
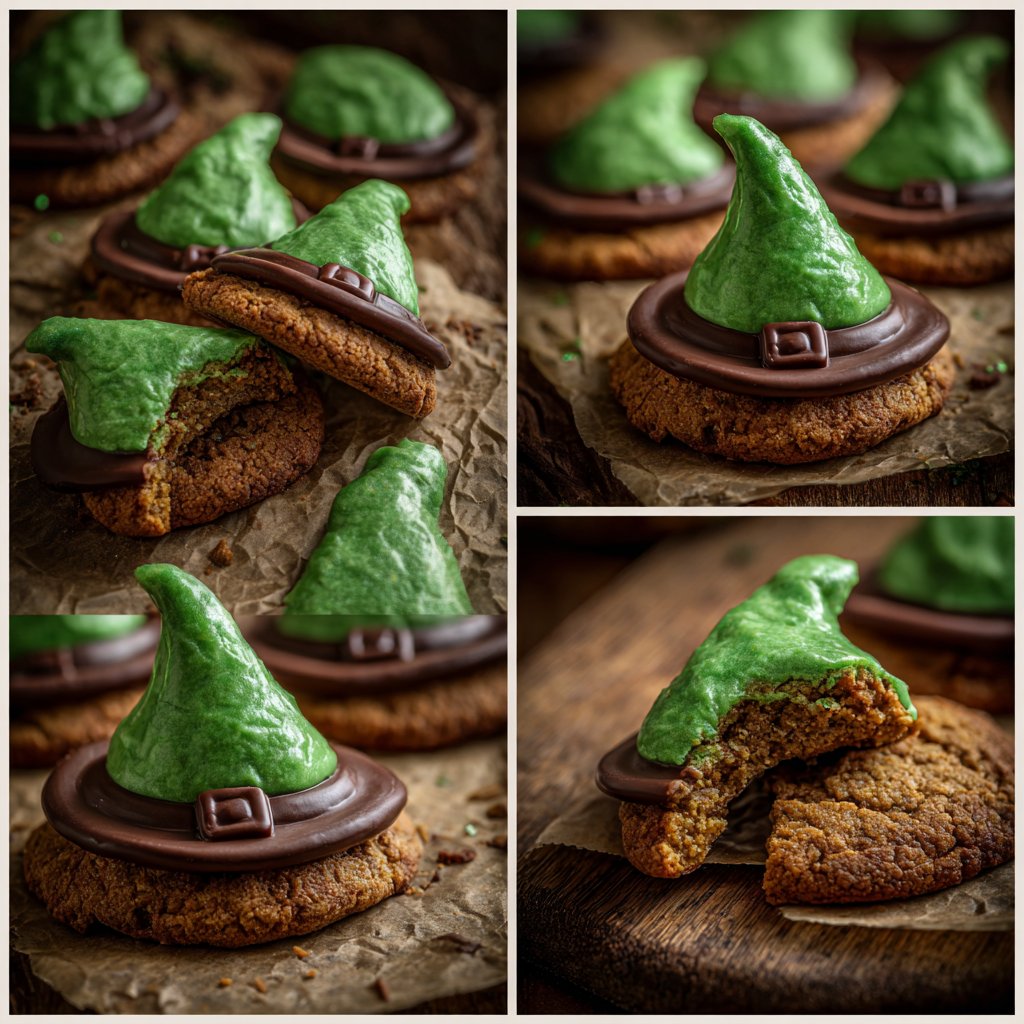
I love baking during the holiday season, and these Leprechaun Hat Cookies quickly became a favorite in our household. They are not just adorable but also deliciously fun to make. The kids enjoy helping out, especially when it comes to decorating each cookie with colorful icing and sprinkles. With a delightful chocolate base and sweet green accents, these treats are perfect for St. Patrick's Day celebrations or anytime you're in the mood for a festive bite.

When I first experimented with these Leprechaun Hat Cookies, I wanted to create something that would surprise and delight my friends at our St. Patrick's Day gathering. The combination of chocolate and vibrant green icing quickly transformed into little hats that are not only festive but also incredibly tasty!
One tip I learned during this baking adventure is to let the cookies cool completely before icing them. This prevents the icing from melting and running off, allowing for that perfect festive touch. Trust me, it's worth the wait for that flawless finish!
Why You'll Love These Cookies
- Adorably festive way to celebrate St. Patrick's Day
- Perfectly balanced chocolate flavor with sweet icing
- Fun and engaging treat for kids to help decorate
The Perfect Cookie Base
The foundation of these Leprechaun Hat Cookies is a rich chocolate cookie base that remains soft yet slightly chewy. Using unsweetened cocoa powder not only provides the distinct chocolate flavor but also contributes to the cookie's darker color, which contrasts beautifully with the vibrant green icing. Be cautious not to overmix the dough after adding the flour mixture; this can lead to tougher cookies. You want to mix just until the flour is incorporated for the best texture.
When rolling the cookie dough into balls, aim for uniformity in size. Keeping the balls around 1 inch in diameter ensures even baking. If they vary too much in size, you'll end up with some cookies overbaked while others remain undercooked. I like to use a cookie scoop for this purpose, which makes it easier to portion out evenly. After baking, the cookies should have a slightly glossy surface and set edges while still being soft in the center.
Decorating with Flair
Decoration is where the fun truly begins with these cookies! The green icing acts not only as a tasty topping but also serves as a canvas for creativity. If you choose to make your own icing, using a mix of powdered sugar and milk will give you that desired smooth texture. Tinting the icing with gel food coloring is also an excellent way to achieve a bright, vibrant green shade that captures the festive spirit of St. Patrick’s Day. Just be sure to let the icing set for about 30 minutes before adding the chocolate coins, so they don't slide off.
When placing the chocolate coins as the hat brim, ensuring they're slightly pressed into the icing helps them stay put. I recommend decorating the cookies right after icing them, allowing the sprinkles to adhere better. For a charming twist, you can use colored sugar instead of standard sprinkles, which adds a delightful crunch and extra sparkle. If you want to take it a step further, try using different shapes of sprinkles that reflect the holiday theme, like shamrocks or stars.
Ingredients
For the Cookies
- 1 cup unsalted butter, softened
- 1 cup granulated sugar
- 2 cups all-purpose flour
- 1/2 cup unsweetened cocoa powder
- 1 egg
- 1 teaspoon vanilla extract
- 1/2 teaspoon baking powder
- Pinch of salt
For the Decoration
- Green icing (store-bought or homemade)
- Chocolate coins
- Colored sprinkles
- Mini marshmallows (optional)
Instructions
Prepare the Cookie Dough
In a large mixing bowl, cream together the softened butter and granulated sugar until light and fluffy. Add the egg and vanilla extract, mixing until well combined. In another bowl, sift together the flour, cocoa powder, baking powder, and salt. Gradually add the dry ingredients to the wet ingredients, mixing until a dough forms.
Bake the Cookies
Preheat your oven to 350°F (175°C). Roll the dough into small balls and place them on a lined baking sheet. Flatten each ball slightly and bake for 10-12 minutes. Allow the cookies to cool completely on a wire rack.
Decorate the Hats
Once the cookies are cool, spread a layer of green icing on top of each cookie. Place a chocolate coin in the center to resemble the brim of the hat. Add colored sprinkles around the coin for an extra festive touch. For a whimsical addition, you can place mini marshmallows on top to resemble a fluffy hat decoration.
Pro Tips
- For an extra touch, consider adding some edible gold glitter to the icing for a sparkly finish. This will not only enhance the festive look but also create a magical effect that everyone will love!
Storage Tips
These Leprechaun Hat Cookies can be stored at room temperature in an airtight container for up to one week. If you prefer to make them ahead of time, it's best to freeze the baked cookies before decorating. Place the cooled cookies in a single layer between sheets of parchment paper in a freezer-safe container. When you're ready to enjoy them, allow them to thaw for about 30 minutes at room temperature before icing and decorating.
If you anticipate having leftover iced cookies, it’s advisable to store them in the fridge to keep the icing intact. However, to maintain softness, place a slice of bread in the container with them. This will help absorb excess moisture and keep the cookies chewy while preventing the icing from becoming overly hard.
Customizing Your Cookies
Feel free to get creative with the decorations! While the chocolate coins are a fun nod to the leprechaun theme, you can also substitute them with other candies that fit your festive motif, such as gold-wrapped chocolates or gummy candies. Additionally, if you'd like to switch up the flavor of the cookies, consider adding a teaspoon of mint extract along with the vanilla to bring a refreshing twist that pairs beautifully with the chocolate and green icing.
For those who might want a healthier option, you can try making a whole wheat flour version by substituting half the all-purpose flour with whole wheat flour. Keep in mind that this may slightly alter the texture, making it denser, but it will still yield delicious cookies. Finally, consider adding mini chocolate chips to the dough for an extra burst of chocolate in each bite, making a delightful variation on the classic recipe.
Questions About Recipes
→ Can I use a different flavor for the cookies?
Absolutely! You can substitute the cocoa powder with more flour and use vanilla or almond extract for different flavored cookies.
→ How do I store the cookies?
Store the cookies in an airtight container at room temperature for up to a week. They also freeze well if you want to save some for later!
→ Can the icing be made from scratch?
Yes, homemade icing can be easily made with powdered sugar, milk, and food coloring to achieve your desired green hue.
→ Are there any common mistakes to avoid?
One common mistake is not allowing the cookies to cool completely before decorating. This can lead to melted icing and messy results!
Leprechaun Hat Cookies
Created by: The Chefquinncooks Team
Recipe Type: Simple Sweets
Skill Level: Intermediate
Final Quantity: 24 cookies
What You'll Need
For the Cookies
- 1 cup unsalted butter, softened
- 1 cup granulated sugar
- 2 cups all-purpose flour
- 1/2 cup unsweetened cocoa powder
- 1 egg
- 1 teaspoon vanilla extract
- 1/2 teaspoon baking powder
- Pinch of salt
For the Decoration
- Green icing (store-bought or homemade)
- Chocolate coins
- Colored sprinkles
- Mini marshmallows (optional)
How-To Steps
In a large mixing bowl, cream together the softened butter and granulated sugar until light and fluffy. Add the egg and vanilla extract, mixing until well combined. In another bowl, sift together the flour, cocoa powder, baking powder, and salt. Gradually add the dry ingredients to the wet ingredients, mixing until a dough forms.
Preheat your oven to 350°F (175°C). Roll the dough into small balls and place them on a lined baking sheet. Flatten each ball slightly and bake for 10-12 minutes. Allow the cookies to cool completely on a wire rack.
Once the cookies are cool, spread a layer of green icing on top of each cookie. Place a chocolate coin in the center to resemble the brim of the hat. Add colored sprinkles around the coin for an extra festive touch. For a whimsical addition, you can place mini marshmallows on top to resemble a fluffy hat decoration.
Extra Tips
- For an extra touch, consider adding some edible gold glitter to the icing for a sparkly finish. This will not only enhance the festive look but also create a magical effect that everyone will love!
Nutritional Breakdown (Per Serving)
- Calories: 150 kcal
- Total Fat: 7g
- Saturated Fat: 4g
- Cholesterol: 20mg
- Sodium: 50mg
- Total Carbohydrates: 20g
- Dietary Fiber: 1g
- Sugars: 10g
- Protein: 2g